In this article, you will learn how to install a single gang electrical box in wood frame construction. This is from my electrical roughing-in series!
The most important thing when roughing in is understanding your box heights, making sure the electrical box is sticking out the right depth, and using electrical scabs to create distance if needed.
(Also known as a Single Gang Outlet)
What We Cover in this Article:
- Tools Needed for Boxing Electrical Outlets
- Best Ways to Install a Single Gang Box
- Always Install Boxes with Screws
- What’s the Right Mounting Height for Plugs and Switches?
- Use TOP OF BOX for Easiest Installation
- How to Layout (Markout)
- Drywall Depth to Meet Electrical Code
Tools Needed for Boxing Electrical Outlets
When boxing, you only need a few tools, like a drill, tape measure, screws, and a hammer (when installing electrical scabs for lights).
Many times companies try to make you wear a tool pouch, but the thing is as an electrician, most tasks only require a couple tools, and it’s not necessary.
A tool pouch can be heavy, and hurt your back over time!
Also, if you wear coveralls, you can be just as efficient, and protect your clothing 🙂
It’s all about protecting your body for the long-term in construction. Next time you’re on the jobsite, look at those of older age. Many times they do not protect their body, and it shows! (Like.. they didn’t wear hearing protection, knee pads, or dust masks over the years!)
Best Ways to Install a Single Gang Box
I’ll quickly cover the recommended ways of installing a single gang switch box for a strong installation.

You want to make sure the electrical box is not slanted. Doing so can make it very tricky in the finishing stages of electrical.
(This also holds true if the box is twisted left and right as well!! Make sure the stud is straight, or it will be hard to get your coverplate on flush!)

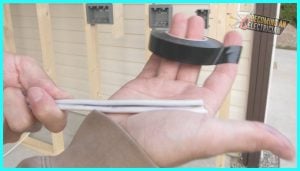
You’ll find if you use any other screw hole, other than the closest screw hole, the box becomes a bit flimsy.
If it’s a single gang switch, flimsy isn’t as big of a deal.. but if it’s a plug, it matters much more because of the force of pushing a cord into the receptacle. (And nowadays, many plugs are tamper-resistent, requiring even more force than ever!)
Using the closest screwhole (shown by my finger in the image above), will give you the tightest install!

Please note, I like to go TOP OF BOX when measuring and installing electrical boxes, which we cover in the video above and in this article.
This is an example of a finished single gang switch install, also known “general plugs and switches”.
If you are measuring box heights for “serious plugs and switches”, make sure to measure to the SCREW HOLE of these boxes, or use a laser if you have one!
This is when boxes are installed very close together, or if there’s a visual line to compare box heights easily to the eye (like kitchen backsplash groutlines).

Always Install Boxes with Screws

These are small “homeowner” sized packages. On a jobsite, you’ll see screws in BIG CARDBOARD BOXES (1,000+ screws!).
When you’re an electrical apprentice, you don’t know any better. You show up on site, you have your drill ready to install electrical boxes, but find out, your company is using nails instead of screws! 🤮
This is a clear sign your company is CHEAP, as screws are the best approach for electrical box installation in terms of SPEED and holding tight for years to come.
Did you know that nails are stronger than screws for “shear strength?”.. However, nails can become loose over time! So use screws when boxing for best results!
Here’s the fast boxing workflow:
Simply take a good handful of 8×1 screws, and place them in the opposite pocket of your dominent hand. (If you’re right-handed, put the screws in your left pocket). This will allow you to access the screws faster and easier.
This tip also applies when stapling wires! Put the staples in the opposite pocket, and you’ll have a great workflow!
Different Kinds of Wood Screws for Boxing
When installing electrical boxes, we simply use 8×1 screws.
8 is the size of screw head, 1 means it’s 1″ long.
(This is for Robertson screws.)

When installing electrical scabs, you’ll want to use 8×3 wood screws:

Notice this particular 8×3 has a smooth “body” before reaching the threads, whereas the 8×1 threads go all the way up!
8×1’s are great for mounting electrical boxes (and fit great in your pocket).
8×3’s are what we use for electrical scabs (explained below).
I also wanted to share a picture that 8×1 and 8×3 have the same screwhead size, confirming that in 8×1, 8 is the screwhead size, and 1 is it’s length:

GOTCHA.. Be careful, the “Robertson” (square head) standard of screw head is confusing.. It’s categorized as #1 (Green), #2 (Red), or #3 (Black).. but screw heads are #6 (Green), #8 (Red), and #12 (Black).. so most people on site just called the Robertson sized bits #6, #8, and #12 for the driver bit and screwhead to keep thing simple.
To learn more, view the Robertson Wikipedia Chart!
And before moving on, here’s an of a completed box install using an electrical scab to save you time.
An electrical scab is used to push the electrical box further away from the door, for example. (No more than 2 electrical scabs!)

What’s the Right Mounting Height for Plugs and Switches?
Mounting electrical boxes the wrong height is a COMMON MISTAKE.. so read close!
On the FRONT of your electrical prints, there is often a legend which explains electrical device icons like plug symbols, switch symbols, or things like fire alarm devices!
This legend may also give box heights… HOWEVER.. READ THE VERY LAST PAGES of your electrical prints (called our jobsite specs), as the engineer often specificies HOW they want the boxes installed, such as bottom of box, center of box, or TOP OF BOX!
Not reading your jobsite specs could be a very expensive mistake (such as pulling the building in NMD wire, rather than piping it in EMT).
The short answer of what’s the proper height to mount electrical boxes is.. each jobsite is different, so look at your electrical prints, and jobsite specs for EXACT measurements.
If you don’t have prints, I like to do the “pretend switch test”. Walk into the room, and pretend to turn on the switch.. that’s a good place to start.. But a general starting point would be 16″ for plugs, and 48″ for switches.. TOP OF BOX.
Use TOP OF BOX for Easiest Installation

Please read + view image below to understand stud markings.
Let’s say you’re on new jobsite, and your jobsite specs say “CENTER OF BOX”.
Let’s also say your electrical legend (front page of electrical prints) says 46″ for switches.
I’d first figure out my AFF (Above Finished Floor), measure and mark 46″ on the stud, place the box center, then mark “TOP OF BOX”.
I’d then write down this new TOP OF BOX measurement, and tell the electrical crew the TOP OF BOX measurement we’re mounting our boxes at. (It’s the same as center now, but WAY EASIER to install).
The line that looks like > means TOP OF BOX (LEFT SIDE).
If you see an X on the side of a stud, that means 1 electrical scab. (2 X’s is two scabs).
How to Layout (Markout)

Marking out (or electrical layout) is when an experienced apprentice or journeyman electrician looks at the electrical prints, and marks electrical devices and heights with a permanent marker on the studs!
It’s very important to markout BEFORE you install electrical boxes.
I like creating a “sparky stick” when laying out. It’s a scrap piece of wood that you cut to the length of switch heights, and cut a notch for plug heights. This way, you don’t have to use a tape measure for general switches and plugs (HUGE time saver).
REMEMBER: There’s “general” plugs/switches, and “serious” plugs/switches.
General means no one will notice if you’re 1/4″ or 1/2″ off because the plugs/switches are too far away from each other to compare heights.
Serious means even an 1/8″ difference in height is noticeable.. so in those situations, use a laser or measure to the screwhole!
After marking out electrical devices and heights is complete, the next step is to lay out the electrical boxes on the floor that are needed at each location.
Sometimes you just need a single gang for a plug, or there may be a switch, plug, and thermastat.
When you work for a company with multiple electricians, this is the optimal workflow as everyone can prepare the next person until all layout/markout is done, and each person will then start boxing together.
REMEMBER: When you can use one tool over and over, it provides much faster results.. Compared to measuring each box individually, installing it, then moving to the next one!!
Drywall Depth to Meet Electrical Code
The final thing we need to discuss about installing a single gang electrical box is drywall depth.
In a home, drywall depth isn’t as much of a concern, but in a commercial building, like a condo/apartment, or a big box store, drywall depth is one of those GOTCHAS that will get you every time, and this is because of fire rating.

If you look at a plastic electrical box, it has box ears. These ears are useful for getting your electrical box flush in a normal drywall installation of just one layer of drywall.
But.. we electricians must look at our architectural prints, which tells us how many layers of drywall and plywood are going on the wall!

You can break these tabs to push the box out further, and meet electrical code!
You can easily break off these box tabs to push the box out further.

So, ANY WALL you’re going to install boxes on, make sure you know how many layers of plywood and drywall are going to be installed.
If you’re box is too deep, it does not meet code, and requires a plastic box insert (which I call an “oopsie” 😂).
Also note, Drywall is for fire rating. Plywood is not fire-rating, but for building strength, but they both add depth to the wall, which you have to know for how far to push your box out.
There can be 1/4″, 1/2″, 5/8″, or even 3/4″!!!
Most common is 1/2″ and 5/8″, however!
ALWAYS ERROR ON THE SIDE OF CAUTION.. For example, if you’re not sure if it’s 1/2″ or 5/8″, go with 1/2″, as it’s better to be too deep than sticking outside of the wall!
If it’s too deep in, you just use an inexpensive box insert (oopsie), and long screws. If the box is sticking out, have fun fixing that 😁.
Conclusion: Installing a Plastic Electrical Box
So there you go!
That’s TONS of info for how to mount and install an electrical box. This goes for switch boxes and receptacle outlets.
Make sure to watch the video above for more details..
AND.. to keep learning by viewing my electrical rough-in series!
Leave a comment if you have questions!