
In this article, you will learn how to splice wires!
You will learn how to splice three wires, and how to splice four wires, as well!
I walk you through the whole process of how to properly twist wires together as an electrician, from removing the jacket (sheathing), stripping the conductor insulation, and finally, splicing the wires for the final connection! (this article!)
What We Cover in this Article:
- How to Make Life EASY While Splicing
- How to Splice Wires for Electricians
- One Wire Nut DOES NOT FIT ALL!
- How to Splice Four or More Wires
How to Make Life EASY While Splicing
Before getting into this article, here’s some QUICK TIPS to make splicing easy as an electrician:
- Strip the wire a bit LONGER (especially with bigger sized wire like #12 and #10!)
- Gently MOLD the wire to form a braid before you do your last HARD/TIGHT splice
- Make sure the splice fits under the wire nut comfortably
- DO NOT OVER TIGHTEN A WIRE NUT
I want to stress, if you over tighten a wire nut, it will stress the plastic.
I’ve seen someone tighten a Marrette (wire nut) so tight, that the copper literally came out of the end… LOL!!!!! 🤣🤦♂️
How to Splice Wires for Electricians
Again, this is part of my cutting-in series, and in this article, we are now covering splicing wires!
We previously covered:
And now, we will talk about how to twist the wires together with pliers (other known as splicing!)
Remember, the biggest thing is MAKING SURE THE COPPER IS STRONG. If you score the wire when stripping single conductor, I highly suggest cutting the wire, and re-stripping it keep the integrity of the wire!

Notice the insulation is all lined up! This will make a clean splice!
Splicing three wires is VERY COMMON as an electrician. When you are pulling wire, it’s always wise to think how many wires will be in a box. Sometimes you can make your life A LOT EASIER by thinking ahead, and maybe pulling a wire to a different box to splice less wires at each box.
For example, instead of running all wires to one box and you have to splice 5 wires, maybe you split up the wires and only have 3 wires to splice in one box, then 2 wires to splice in the other electrical box!! (This is being wise on your body and hands!)
When splicing, the biggest thing is to line up the conductor insulation. Don’t worry about if the copper of each conductor is longer than another.. after we twist the wires, we cut off the excess.
YOU WANT THE INSULATION TO LINE UP NICELY!
Once you’ve stripped the wires, and lined up the insulation wires, I like to cross one wire over the other two wires in a three wire splice. You will then put your pliers near the insulation, and gently form a braid on the wires. We do this by working the wires UP from the insulation to the END of the copper:

I just want to clearly show you this technique I was shown for gently “molding” the braid to happen in the wire in this video snippet just below:
Video Snippet Shows the “Molding” Technique to Help Form the Braid in Your Wire Splice.
Once the splice has been made, you then need to TRIM and ROUND off the edges to make the splice fit nicely into your wire nut (also commonly called a Marrette).

Now, you may wonder how long should you cut wires after a splice before you put on the wire nut?
A cool trick someone showed me was your pliers can actually be used as a wire length gauge.. BUT YOU MUST BE VERY CAREFUL! If you cut the wrong way with your pliers, you will cut off your splice 😭
Here’s what I mean:


After the cut, again, you will want to quickly re-tighten the splice (it comes a little loose when cutting), plus, you round off the sharp edges to help it fit better into the wire nut!:

Here’s an example of the finished product of a splice with the wire nut on. Again, notice NO COPPER is showing.. this is VERY IMPORTANT for safety!

One Wire Nut DOES NOT FIT ALL!
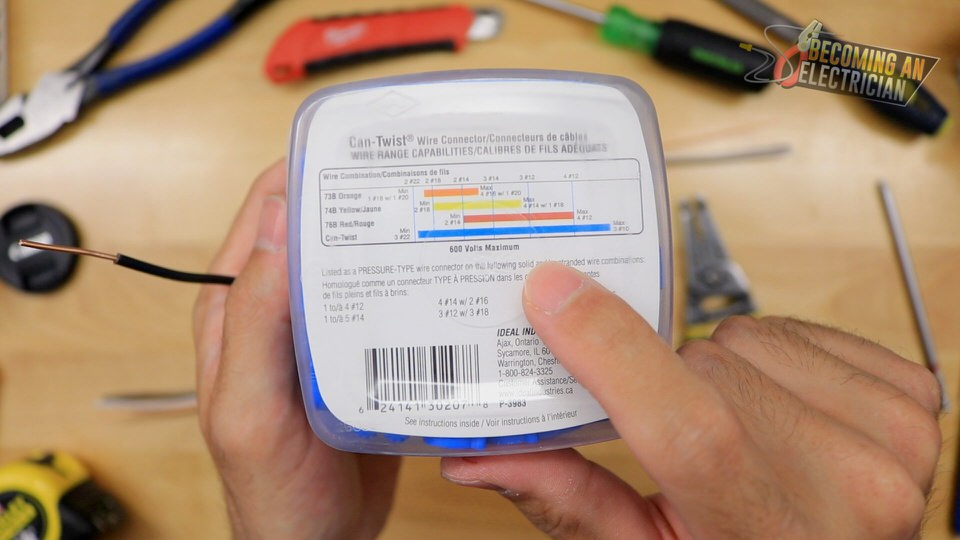
Before continuing on, it’s VERY IMPORTANT to understand that a single wire nut does not fit all sizes, no matter what ANY BRAND SAYS. There are different colors of wire nuts for different sizes of wire, and how many wires you are splicing together under one wire nut.
For example, orange wire nuts are for FIRE ALARM as they are small 18 gauge wire. Blue/Yellow wire nuts are very similar, and are usually for #14-#12.. you can usually fit 4-5 #14 or 3-4 #12 wires.. (maybe 2 #10’s..)
Red wire nuts are typically for #10 (especially when splicing 3-4 #10’s), and there’s also BIG BLUES for big splices or bigger conductors..
Here’s a picture from the video.. again this brand is saying “one size fits all”.. it’s not true, but the chart is useful as they often share how many wires and the size of wire you’re allowed under a certain sized wire nut!:
How to Splice Four or More Wires
The same principles apply when splicing four or more wires. Strip the wire longer to make life easier, and line up the insulation ends.
I also told you in the video.. TREAT EVERYTHING LIKE IT’S LIVE (has power).. so to line up your wires, you should use your pliers to butt up the insulation ends, like I show here:

Once you have the insulation ends lined up, it should look like this!:

Again, start your splice by gently molding from the insulation ends, and working the braid OUT:

Again, your wire nut SHOULD NOT look like this.. where you’ve stressed the wire nut:

And again.. here’s a final end product of what the 4 wire splice should look like!:

Conclusion: How to Splice Wires for Electricians
That’s how you splice wires for electricians in a residential or commercial setting.
If you are dealing with smaller wire, like #14, splicing is MUCH EASIER.
In a commercial setting, electricians typically deal with #12 MINIMUM for everything (plugs and lights).. so things are a bit harder on our hands!
Like I said in the video, you need to strengthen your hand muscles, and it only comes with time by splicing wires!
Use the tricks such as stripping the wire extra long, especially when splicing many wires, or dealing with bigger gauge wire, as it will help your hands and wrists.. your body needs to last you your lifetime.. so protect your body, and you’ll be able to splice with no problems! 🙂


Russel Kaufman
Jul 19, 2023 @ 5:35 AMExcellent presentation
Riley Weller
Jul 19, 2023 @ 10:20 AMThank-you! How to Splice Electrical Wires is not an easy task to learn.. especially when you are splicing more than 3 wires, or when splicing big gauge wire.. like how to splice 4 #12 AWG wires together..
It requires building hand strength between your thumb and index finger, which only happens from repetivitive splicing electricians would do on a daily basis.